- Published on
Microservices with FastAPI and RabbitMQ
- Authors

- Name
- Hoàng Hữu Mạnh
Introduction:
Kiến trúc microservices đã trở nên phổ biến trong những năm gần đây nhờ khả năng tạo ra các ứng dụng có khả năng mở rộng, dễ bảo trì và linh hoạt. Trong bài đăng trên blog này, chúng ta sẽ khám phá các khái niệm về kiến trúc microservices và thể hiện cách xây dựng các microservices đơn giản bằng cách sử dụng FastAPI và RabbitMQ, hai công cụ mạnh mẽ trong hệ sinh thái Python.
Trước khi tìm hiểu về kiến trúc microservices, hãy cùng nhìn vào kiến trúc monolithic.
Kiến trúc Monolithic là gì?
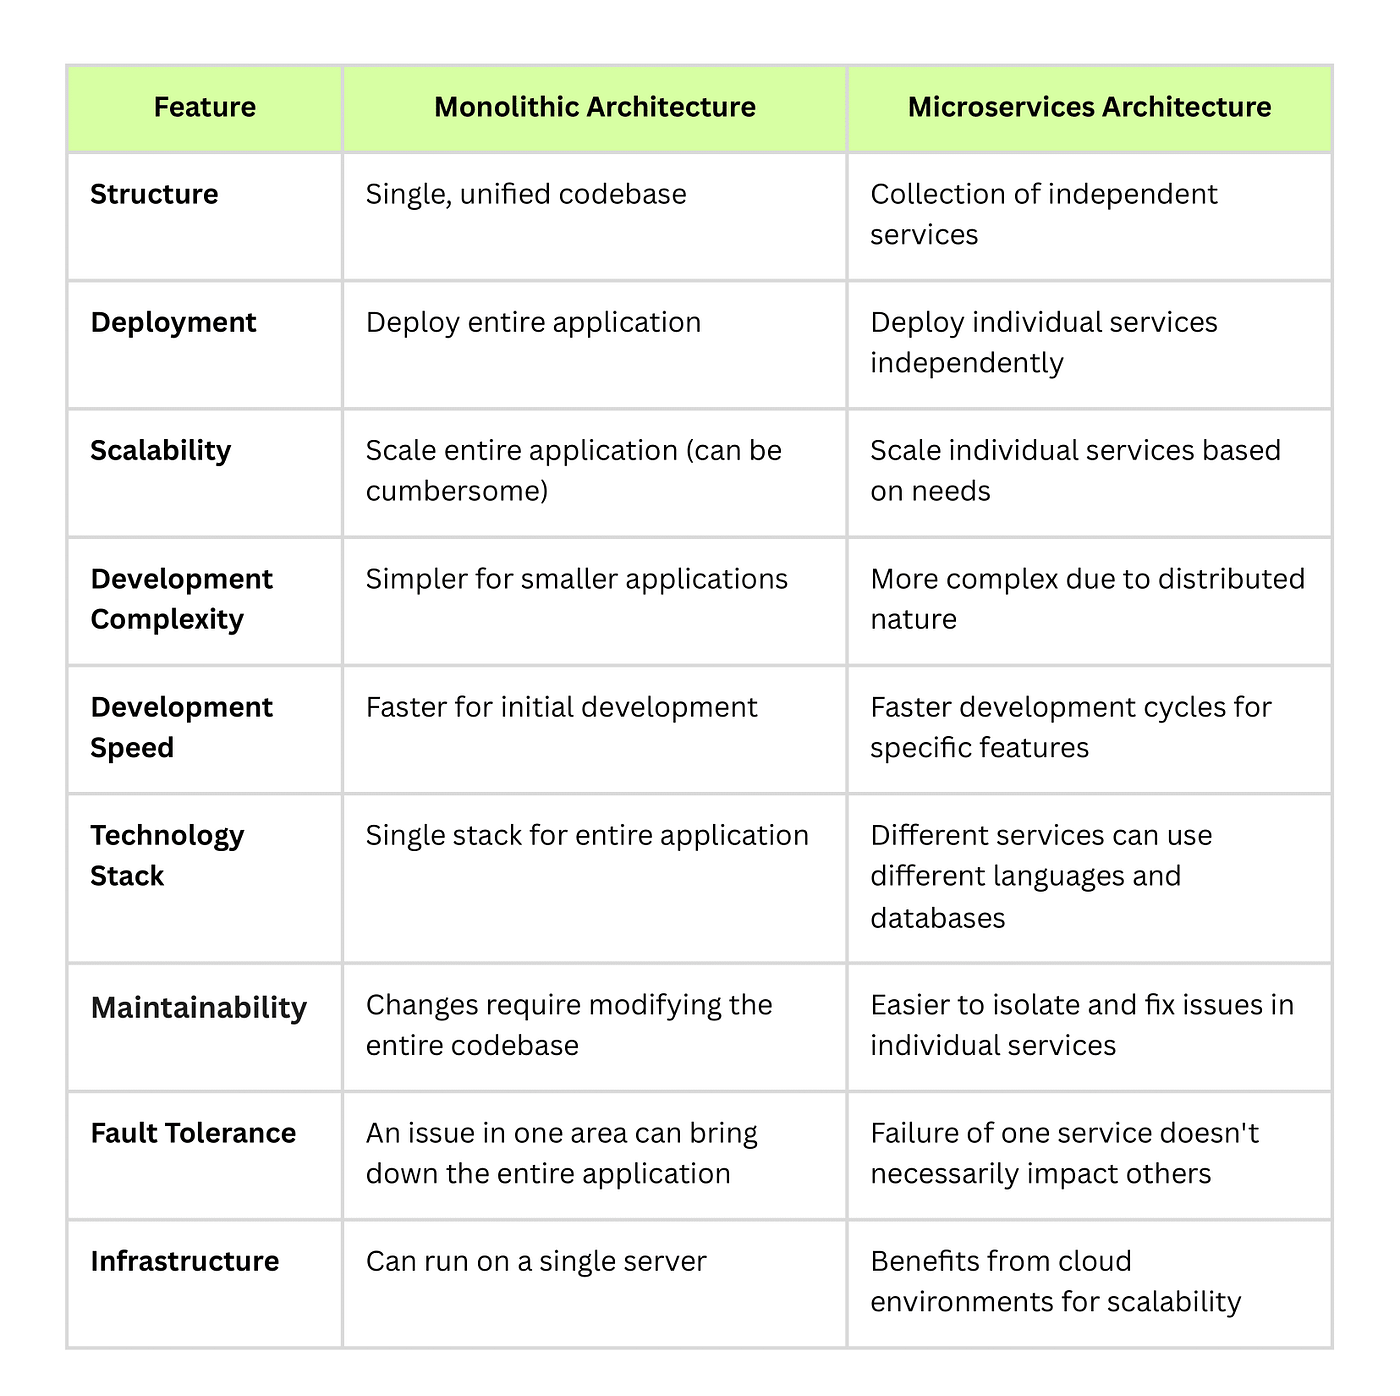
Một kiến trúc monolithic giống như một mạng máy tính lớn duy nhất với một mã nguồn kết hợp tất cả các vấn đề kinh doanh lại với nhau. Hãy tưởng tượng nó như một cấu trúc băng to lớn, chứa tất cả các thành phần của ứng dụng của bạn dưới một mái nhà. Việc thay đổi trong một monolith đòi hỏi cập nhật toàn bộ stack, điều này có thể tốn thời gian và hạn chế. Bạn có thể thấy ví dụ về kiến trúc monolithic trong biểu đồ dưới đây.

What is Microservice Architecture ?
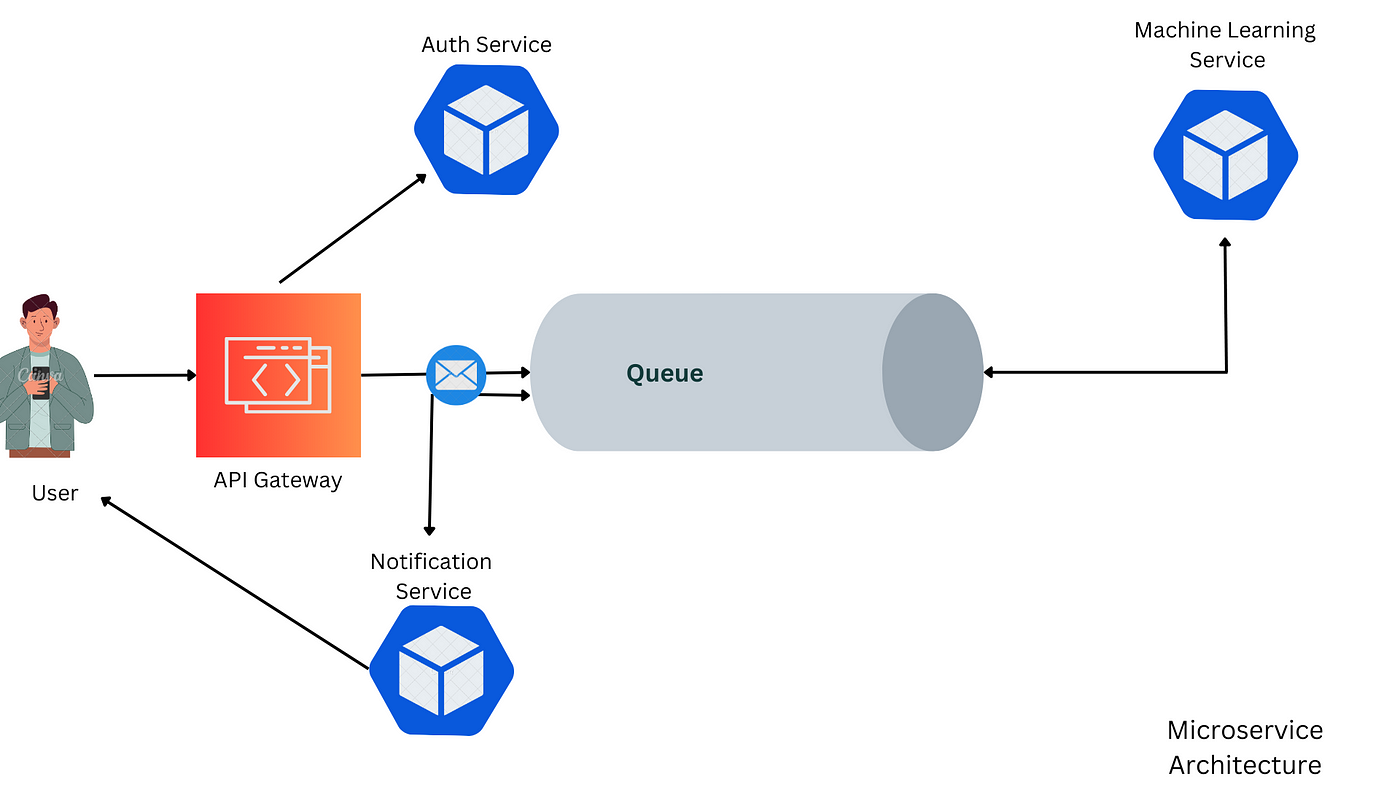
Kiến trúc Microservices, ngược lại, là một phương pháp trong đó một ứng dụng được chia thành các dịch vụ nhỏ hơn, có thể triển khai độc lập. Mỗi dịch vụ có logic kinh doanh và cơ sở dữ liệu riêng, và giao tiếp với các dịch vụ khác qua các giao thức nhẹ. Phương pháp này cho phép chu kỳ phát triển nhanh hơn, bảo trì dễ dàng hơn và khả năng mở rộng tốt hơn.

Difference between Monolithic and Microservice
What is RabbitMQ, and why is it used for building microservices?
RabbitMQ là một trình kết nối tin nhắn thực hiện Giao thức Hàng đợi Tin nhắn Tiên tiến (AMQP). Nó hoạt động như một trung gian cho các thành phần khác nhau của một hệ thống phân tán, cho phép chúng giao tiếp và phối hợp nhiệm vụ một cách hiệu quả. Dưới đây là lý do tại sao RabbitMQ thường được sử dụng trong kiến trúc microservices:
- Tách biệt: RabbitMQ giúp tách biệt các thành phần của một hệ thống bằng cách cho phép chúng giao tiếp bất đồng bộ. Điều này có nghĩa là các dịch vụ có thể tiếp tục hoạt động độc lập mà không cần chờ đợi phản hồi từ nhau, dẫn đến các hệ thống linh hoạt và có khả năng mở rộng hơn.
- Cân bằng tải: RabbitMQ có thể phân phối tin nhắn trên nhiều phiên bản người tiêu thụ, giúp cân bằng tải và đảm bảo sử dụng tài nguyên hiệu quả.
- Khả năng chịu lỗi: RabbitMQ hỗ trợ gom cụm và sao chép, đảm bảo rằng các tin nhắn không bị mất ngay cả khi một nút thất bại. Điều này làm cho hệ thống trở nên chịu lỗi và đáng tin cậy hơn.
- Khả năng mở rộng: RabbitMQ cho phép bạn mở rộng hệ thống của mình bằng cách thêm nhiều phiên bản người tiêu thụ hoặc nút vào cụm, cho phép bạn xử lý lưu lượng tin nhắn tăng lên khi ứng dụng của bạn phát triển.
- Định tuyến tin nhắn: RabbitMQ hỗ trợ các cơ chế định tuyến tin nhắn khác nhau, như trao đổi trực tiếp, chủ đề và fanout, cho phép bạn định tuyến tin nhắn đến các hàng đợi cụ thể dựa trên các khóa định tuyến hoặc mẫu.
- Xác nhận tin nhắn: RabbitMQ hỗ trợ xác nhận tin nhắn, đảm bảo rằng tin nhắn chỉ được xử lý một lần và không bị mất trong quá trình truyền.
- Tổng cộng, RabbitMQ là một hệ thống truyền tin đáng tin cậy và mạnh mẽ giúp xây dựng kiến trúc microservices có khả năng mở rộng, tách biệt và chịu lỗi.
Bây giờ sau khi đã hiểu cơ bản về microservices, hãy đào sâu vào việc lập trình dịch vụ microservices đầu tiên của chúng ta. Chúng ta sẽ khám phá cách thiết kế và triển khai một kiến trúc microservice sử dụng Python, FastAPI, RabbitMQ, và PostgreSQL. Hướng dẫn thực hành này sẽ hướng dẫn bạn cách cài đặt từng thành phần, thiết kế tương tác của các dịch vụ micro và triển khai chúng để tạo ra một ứng dụng hoàn chỉnh. Hãy bắt đầu!
Coding the Microservices Application
1. Project Introduction
Ứng dụng của chúng ta bao gồm bốn dịch vụ chính:
- Dịch vụ Cổng vào (Gateway Service): Dịch vụ này hoạt động như điểm vào cho tất cả các yêu cầu đến. Nó định tuyến các yêu cầu đến các microservices phù hợp và xử lý tổng thể của ứng dụng.
- Dịch vụ ML: Dịch vụ ML chịu trách nhiệm xử lý dữ liệu hình ảnh. Nó sử dụng Keras OCR để trích xuất văn bản từ hình ảnh và giao tiếp với Dịch vụ Cổng vào để nhận dữ liệu hình ảnh và gửi lại văn bản đã trích xuất.
- Dịch vụ Xác thực (Auth Service): Dịch vụ Xác thực xử lý xác thực người dùng và xác minh email. Nó bao gồm chức năng đăng ký người dùng, tạo và xác minh OTP, và đảm bảo xác minh email.
- Dịch vụ Thông báo (Notification Service): Dịch vụ này chịu trách nhiệm gửi email cho người dùng. Nó được kích hoạt khi các quy trình được hoàn thành.
2 .Prerequisites
Trước khi bạn bắt đầu, đảm bảo rằng các yêu cầu tiên quyết sau đã được đáp ứng:
- Docker đã được cài đặt trên hệ thống của bạn.
- Python đã được cài đặt trên hệ thống của bạn.
- Bạn có kiến thức cơ bản về Docker, Python và PostgreSQL.
3. Setting Up Requirements
Installing PostgreSQL with Docker
Để cài đặt PostgreSQL bằng Docker, chạy lệnh sau:
docker run --name postgres-db -e POSTGRESPASSWORD=mysecretpassword -d postgres
Installing RabbitMQ with Docker
Để cài đặt RabbitMQ bằng Docker, chạy lệnh sau:
docker run -d --hostname my-rabbit --name some-rabbit -p 5672:5672 -p 15672:15672 rabbitmq:3-management
4. Setting Up the Project
A. Setting Up the Project folder
microservices-demo/
│
├── gateway/
│ ├── rpcclient.py
│ ├── .env
│ ├── requirements.txt
│ └── main.py
│
├── mlservices/
│ ├── requirements.txt
│ ├── artifacts/
│ ├── .env
│ └── main.py
│
├── notificationservice/
│ ├── emailservice.py
│ ├── requirements.txt
│ ├── .env
│ └── main.py
│
├── auth/
│ ├── database.py
│ ├── models.py
│ ├── schemas.py
│ ├── service.py
│ ├── requirements.txt
│ ├── .env
│ └── main.py
│
└── README.md
B. Implementing the Gateway
Trong phần này, chúng ta sẽ tập trung vào việc triển khai dịch vụ cổng vào (gateway service), dịch vụ này hoạt động như điểm vào cho tất cả các yêu cầu đến trong kiến trúc microservices của chúng ta. Dịch vụ cổng vào có trách nhiệm định tuyến các yêu cầu đến các microservices phù hợp và xử lý tổng thể của ứng dụng.
Now, let’s implement the gateway service. Create a **main.py** file in the **gateway/** directory with the following code:
from fastapi import FastAPI, HTTPException ,  File, UploadFile
import fastapi as _fastapi
from fastapi.security import OAuth2PasswordBearer
from dotenv import load_dotenv
from jwt.exceptions import DecodeError
from pydantic import BaseModel
import requests
import base64
import pika
import logging
import os
import jwt
import rpc_client

app = FastAPI()
oauth2_scheme = OAuth2PasswordBearer(tokenUrl="token")

# Load environment variables
load_dotenv()
logging.basicConfig(level=logging.INFO)

# Retrieve environment variables
JWT_SECRET = os.environ.get("JWT_SECRET")
AUTH_BASE_URL = os.environ.get("AUTH_BASE_URL")
RABBITMQ_URL = os.environ.get("RABBITMQ_URL")

# Connect to RabbitMQ
connection = pika.BlockingConnection(pika.ConnectionParameters(RABBITMQ_URL)) # add container name in docker
channel = connection.channel()
channel.queue_declare(queue='gatewayservice')
channel.queue_declare(queue='ocr_service')


# JWT token validation
async def jwt_validation(token: str = _fastapi.Depends(oauth2_scheme)):
    try:
        payload = jwt.decode(token, JWT_SECRET, algorithms=["HS256"])
        return payload
    except DecodeError:
        raise HTTPException(status_code=401, detail="Invalid JWT token")

# Pydantic models for request body
class GenerateUserToken(BaseModel):
    username: str
    password: str

class UserCredentials(BaseModel):
    username: str
    password: str

class UserRegisteration(BaseModel):
    name: str
    email: str
    password: str

class GenerateOtp(BaseModel):
    email: str

class VerifyOtp(BaseModel):
    email: str
    otp: int


# Authentication routes
@app.post("/auth/login", tags=['Authentication Service'])
async def login(user_data: UserCredentials):
    try:
        response = requests.post(f"{AUTH_BASE_URL}/api/token", json={"username": user_data.username, "password": user_data.password})
        if response.status_code == 200:
            return response.json()
        else:
            raise HTTPException(status_code=response.status_code, detail=response.json())
    except requests.exceptions.ConnectionError:
        raise HTTPException(status_code=503, detail="Authentication service is unavailable")

@app.post("/auth/register", tags=['Authentication Service'])
async def registeration(user_data:UserRegisteration):
    try:
        response = requests.post(f"{AUTH_BASE_URL}/api/users", json={"name":user_data.name,"email": user_data.email, "password": user_data.password})
        if response.status_code == 200:
            return response.json()
        else:
            raise HTTPException(status_code=response.status_code, detail=response.json())
    except requests.exceptions.ConnectionError:
        raise HTTPException(status_code=503, detail="Authentication service is unavailable")

@app.post("/auth/generate_otp", tags=['Authentication Service'])
async def generate_otp(user_data:GenerateOtp):
    try:
        response = requests.post(f"{AUTH_BASE_URL}/api/users/generate_otp", json={"email":user_data.email})
        if response.status_code == 200:
            return response.json()
        else:
            raise HTTPException(status_code=response.status_code, detail=response.json())
    except requests.exceptions.ConnectionError:
        raise HTTPException(status_code=503, detail="Authentication service is unavailable")

@app.post("/auth/verify_otp", tags=['Authentication Service'])
async def verify_otp(user_data:VerifyOtp):
    try:
        response = requests.post(f"{AUTH_BASE_URL}/api/users/verify_otp", json={"email":user_data.email ,"otp":user_data.otp})
        if response.status_code == 200:
            return response.json()
        else:
            raise HTTPException(status_code=response.status_code, detail=response.json())
    except requests.exceptions.ConnectionError:
        raise HTTPException(status_code=503, detail="Authentication service is unavailable")
# ml microservice route - OCR route
@app.post('/ocr' ,  tags=['Machine learning Service'] )
def ocr(file: UploadFile = File(...),
        payload: dict = _fastapi.Depends(jwt_validation)):

    # Save the uploaded file to a temporary location
    with open(file.filename, "wb") as buffer:
        buffer.write(file.file.read())

    ocr_rpc = rpc_client.OcrRpcClient()

    with open(file.filename, "rb") as buffer:
        file_data = buffer.read()
        file_base64 = base64.b64encode(file_data).decode()

    request_json = {
        'user_name':payload['name'],
        'user_email':payload['email'],
        'user_id':payload['id'],
        'file': file_base64
    }

    # Call the OCR microservice with the request JSON
    response = ocr_rpc.call(request_json)

    # Delete the temporary image file
    os.remove(file.filename)
    return response


if __name__ == "__main__":
    import uvicorn
    uvicorn.run("main:app", host="0.0.0.0", port=5001, reload=True)
Để thiết lập môi trường cho gateway, hãy tạo một tệp **.env** trong thư mục của gateway.
AUTHBASEURL=http://0.0.0.0:5000
JWTSECRET=e56623570e0a0152989fd38e13da9cd6eb7031e4e039e939ba845167ee59b496
RABBITMQURL=localhost
Để giao tiếp với các microservices khác, chúng ta sẽ sử dụng RabbitMQ, một trình kết nối tin nhắn cho phép gửi tin nhắn bất đồng bộ giữa các dịch vụ. Chúng ta sẽ tạo một tệp **rpc_client.py** trong thư mục **gateway/** để xử lý việc giao tiếp với máy chủ RabbitMQ.
import pika
import uuid
import json
from dotenv import load_dotenv
import os

# Load environment variables
load_dotenv()
RABBITMQ_URL = os.environ.get("RABBITMQ_URL")

class OcrRpcClient(object):

    def __init__(self):
        self.connection = pika.BlockingConnection(
            pika.ConnectionParameters(host=RABBITMQ_URL))

        self.channel = self.connection.channel()

        result = self.channel.queue_declare(queue='', exclusive=True)
        self.callback_queue = result.method.queue

        self.channel.basic_consume(
            queue=self.callback_queue,
            on_message_callback=self.on_response,
            auto_ack=True)

    def on_response(self, ch, method, props, body):
        if self.corr_id == props.correlation_id:
            self.response = body

    def call(self, message):
        self.response = None
        self.corr_id = str(uuid.uuid4())
        self.channel.basic_publish(
            exchange='',
            routing_key='ocr_service',
            properties=pika.BasicProperties(
                reply_to=self.callback_queue,
                correlation_id=self.corr_id,
            ),
            body=json.dumps(message))
        while self.response is None:
            self.connection.process_data_events()
        response_json = json.loads(self.response)
        return response_json
Đoạn mã này định nghĩa một lớp khách hàng, OcrRpcClient, để gửi các tin nhắn đến một dịch vụ nhỏ hình ảnh văn bản (ML Microservice) sử dụng RabbitMQ. Nó khởi tạo kết nối, thiết lập một hàng đợi gọi lại cho các phản hồi, và cung cấp một phương thức để gửi tin nhắn và nhận các phản hồi bất đồng bộ.
- Initialization (
__init__):
Thiết lập kết nối tới RabbitMQ. Tạo một kênh và khai báo một hàng đợi gọi lại duy nhất. Thiết lập một người tiêu thụ để lắng nghe các phản hồi trên hàng đợi gọi lại.
2. Sending Requests (**call**):
Gửi một tin nhắn đến dịch vụ nhỏ hình ảnh văn bản (ML Microservice). Chờ đợi phản hồi trên hàng đợi gọi lại và trả về nó.
Lớp này cho phép dịch vụ cổng vào giao tiếp với dịch vụ nhỏ hình ảnh văn bản một cách hiệu quả bằng cách sử dụng RabbitMQ.
C. Triển khai Dịch vụ Xác thực (Auth Microservice)
Trong phần này, chúng ta sẽ tập trung vào việc triển khai dịch vụ xác thực, dịch vụ này hoạt động như điểm vào cho tất cả các yêu cầu liên quan đến xác thực trong kiến trúc microservices của chúng ta. Dịch vụ xác thực có trách nhiệm xác thực người dùng, đăng ký và tạo mã OTP. Bây giờ, hãy triển khai dịch vụ xác thực.
Tạo một tệp main.py trong thư mục auth/ với mã sau:
Đoạn mã này triển khai một dịch vụ xác thực sử dụng FastAPI cho đăng ký người dùng, đăng nhập, tạo mã JWT, xác minh email bằng cách sử dụng OTP, và lấy hồ sơ người dùng. Nó sử dụng SQLAlchemy cho các hoạt động cơ sở dữ liệu và RabbitMQ để gửi email OTP. Dịch vụ bao gồm các điểm cuối cho việc tạo người dùng, tạo mã JWT, lấy hồ sơ người dùng và xác minh OTP cho việc xác minh email.
from typing import List
from fastapi import HTTPException
import fastapi as _fastapi
import schemas as _schemas
import sqlalchemy.orm as _orm
import models as _models
import service as _services
import logging
import database as _database
import pika

# rabbitmq connection
connection = pika.BlockingConnection(pika.ConnectionParameters(host="localhost"))
channel = connection.channel()
channel.queue_declare(queue='email_notification')


def get_db():
    db = _database.SessionLocal()
    try:
        yield db
    finally:
        db.close()

app = _fastapi.FastAPI()
logging.basicConfig(level=logging.INFO)
_models.Base.metadata.create_all(_models.engine)


@app.post("/api/users" ,  tags = ['User Auth'])
async def create_user(
    user: _schemas.UserCreate,
    db: _orm.Session = _fastapi.Depends(_services.get_db)):
    db_user = await _services.get_user_by_email(email=user.email, db=db)

    if db_user:
        logging.info('User with that email already exists')
        raise _fastapi.HTTPException(
            status_code=200,
            detail="User with that email already exists")

    user = await _services.create_user(user=user, db=db)

    return _fastapi.HTTPException(
            status_code=201,
            detail="User Registered, Please verify email to activate account !")


# Endpoint to check if the API is live
@app.get("/check_api")
async def check_api():
    return {"status": "Connected to API Successfully"}


@app.post("/api/token" ,tags = ['User Auth'])
async def generate_token(
    #form_data: _security.OAuth2PasswordRequestForm = _fastapi.Depends(),
    user_data: _schemas.GenerateUserToken,
    db: _orm.Session = _fastapi.Depends(_services.get_db)):
    user = await _services.authenticate_user(email=user_data.username, password=user_data.password, db=db)

    if user == "is_verified_false":
        logging.info('Email verification is pending. Please verify your email to proceed. ')
        raise _fastapi.HTTPException(
            status_code=403, detail="Email verification is pending. Please verify your email to proceed.")

    if not user:
        logging.info('Invalid Credentials')
        raise _fastapi.HTTPException(
            status_code=401, detail="Invalid Credentials")

    logging.info('JWT Token Generated')
    return await _services.create_token(user=user)


@app.get("/api/users/me", response_model=_schemas.User  , tags = ['User Auth'])
async def get_user(user: _schemas.User = _fastapi.Depends(_services.get_current_user)):
    return user


@app.get("/api/users/profile", tags=['User Auth'])
async def get_user(email: str, db: _orm.Session = _fastapi.Depends(_services.get_db)):
    return db.query(_models.User and _models.Address).filter_by(id=1).first()

@app.post("/api/users/generate_otp", response_model=str, tags=["User Auth"])
async def send_otp_mail(userdata: _schemas.GenerateOtp, db: _orm.Session = _fastapi.Depends(_services.get_db)):
    user = await _services.get_user_by_email(email=userdata.email, db=db)

    if not user:
        raise _fastapi.HTTPException(status_code=404, detail="User not found")

    if user.is_verified:
        raise _fastapi.HTTPException(status_code=400, detail="User is already verified")

    # Generate and send OTP
    otp = _services.generate_otp()
    print(otp)
    _services.send_otp(userdata.email, otp, channel)

    # Store the OTP in the database
    user.otp = otp
    db.add(user)
    db.commit()

    return "OTP sent to your email"

@app.post("/api/users/verify_otp", tags=["User Auth"])
async def verify_otp(userdata: _schemas.VerifyOtp, db: _orm.Session = _fastapi.Depends(_services.get_db)):
    user = await _services.get_user_by_email(email=userdata.email, db=db )

    if not user:
        raise _fastapi.HTTPException(status_code=404, detail="User not found")

    if not user.otp or user.otp != userdata.otp:
        raise _fastapi.HTTPException(status_code=400, detail="Invalid OTP")

    # Update user's is_verified field
    user.is_verified = True
    user.otp = None  # Clear the OTP
    db.add(user)
    db.commit()

    return "Email verified successfully"


if __name__ == "__main__":
    import uvicorn
    uvicorn.run("main:app", host="0.0.0.0", port=5000, reload=True)
Tạo một tệp database.py trong thư mục auth/ với mã sau:
Đoạn mã này thiết lập một động cơ SQLAlchemy và session maker để kết nối với cơ sở dữ liệu PostgreSQL. Nó tải chi tiết kết nối cơ sở dữ liệu từ biến môi trường bằng cách sử dụng dotenv. DATABASE_URL được tạo ra bằng cách sử dụng các biến môi trường đã lấy được, bao gồm host, tên cơ sở dữ liệu, tên người dùng và mật khẩu. Động cơ được tạo bằng cách sử dụng create_engine với DATABASE_URL, và SessionLocal được xác định là một session maker được ràng buộc với động cơ này. Biến _Base_ được khởi tạo là một cơ sở khai báo cho việc định nghĩa các mô hình ORM.
import sqlalchemy as _sql
import sqlalchemy.ext.declarative as _declarative
import sqlalchemy.orm as _orm
from dotenv import load_dotenv
import os

# Load environment variables from .env file
load_dotenv()

# Retrieve environment variables
postgres_host = os.environ.get("POSTGRES_HOST")
postgres_db = os.environ.get("POSTGRES_DB")
postgres_user = os.environ.get("POSTGRES_USER")
postgres_password = os.environ.get("POSTGRES_PASSWORD")

# Assuming your PostgreSQL server is running locally with a database named 'mydatabase'
DATABASE_URL = f"postgresql://{postgres_user}:{postgres_password}@{postgres_host}/{postgres_db}"

engine = _sql.create_engine(DATABASE_URL)
SessionLocal = _orm.sessionmaker(autocommit=False, autoflush=False, bind=engine)
Base = _declarative.declarative_base()
Tạo một tệp models.py trong thư mục auth/ với mã sau:
Đoạn mã này định nghĩa các mô hình SQLAlchemy cho các bảng **_User_** và **_Address_**, lưu trữ thông tin người dùng và địa chỉ, với mối quan hệ giữa chúng. Nó cũng tạo các bảng trong cơ sở dữ liệu bằng cách sử dụng động cơ được cung cấp.
import datetime as dt
import sqlalchemy as sql
import sqlalchemy.orm as orm
import passlib.hash as hash
from database import Base , engine
import database as database

Base.metadata.createall(engine)

class User(database.Base):
    tablename = "users"
    id = sql.Column(sql.Integer, primarykey=True, index=True)
    name = sql.Column(sql.String)
    email = sql.Column(sql.String, unique=True, index=True)
    isverified = sql.Column(sql.Boolean , default=False)
    otp = sql.Column(sql.Integer)
    hashedpassword = sql.Column(sql.String)
    addresses = orm.relationship("Address", backpopulates="user")
    datecreated = sql.Column(sql.DateTime, default=dt.datetime.utcnow)

    def verifypassword(self, password: str):
        return hash.bcrypt.verify(password, self.hashedpassword)

class Address(database.Base):
    tablename = "addresses"
    id = sql.Column(sql.Integer, primarykey=True, index=True)
    street = sql.Column(sql.String)
    landmark = sql.Column(sql.String)
    city = sql.Column(sql.String)
    country = sql.Column(sql.String)
    pincode = sql.Column(sql.String)
    userid = sql.Column(sql.Integer, sql.ForeignKey("users.id"))
    user = orm.relationship("User", backpopulates="addresses")
    latitude = sql.Column(sql.Float)
    longitude = sql.Column(sql.Float)
Tạo một tệp schemas.py trong thư mục auth/ với mã sau:
Đoạn mã này định nghĩa các mô hình Pydantic cho các cấu trúc dữ liệu liên quan đến người dùng, bao gồm việc tạo người dùng, xác thực và xác minh OTP. Nó cũng bao gồm một mô hình địa chỉ cho thông tin vị trí. Các mô hình được cấu hình để tự động tạo các thể hiện từ các thuộc tính từ điển.
import datetime
import pydantic


class UserBase(pydantic.BaseModel):
    name: str
    email: str
    class Config:
       fromattributes=True

class UserCreate(UserBase):
    password: str
    class Config:
       fromattributes=True

class User(UserBase):
    id: int
    datecreated: datetime.datetime
    class Config:
       fromattributes=True

class AddressBase(pydantic.BaseModel):
    street: str
    landmark: str
    city: str
    country: str
    pincode: str
    latitude: float
    longitude: float
    class Config:
       fromattributes=True

class GenerateUserToken(pydantic.BaseModel):
    username: str
    password: str
    class Config:
       fromattributes=True

class GenerateOtp(pydantic.BaseModel):
    email: str

class VerifyOtp(pydantic.BaseModel):
    email: str
    otp: int
Tạo một tệp service.py trong thư mục auth/ với mã sau:
Đoạn mã này định nghĩa các hàm và các phụ thuộc khác nhau cho việc xác thực người dùng và sinh mã OTP (mã một lần). Nó sử dụng FastAPI để xử lý các yêu cầu HTTP, SQLAlchemy cho các hoạt động cơ sở dữ liệu, Pydantic để xác thực dữ liệu và tuần tự hóa, JWT để xác thực, và RabbitMQ để gửi thông báo email. Các hàm bao gồm việc tạo cơ sở dữ liệu, lấy phiên làm việc với cơ sở dữ liệu, tạo một người dùng mới, xác thực một người dùng, tạo mã JWT, lấy người dùng hiện tại từ một mã JWT, sinh ngẫu nhiên một mã OTP, kết nối tới RabbitMQ, và gửi thông báo email với mã OTP.
import jwt
import sqlalchemy.orm as _orm
import passlib.hash as _hash
import email_validator as _email_check
import fastapi as _fastapi
import fastapi.security as _security
from passlib.hash import bcrypt
import database as _database
import schemas as _schemas
import models as _models
import random
import json
import pika
import time
import os

# Load environment variables
JWT_SECRET = os.getenv("JWT_SECRET")
RABBITMQ_URL = os.getenv("RABBITMQ_URL")
oauth2schema = _security.OAuth2PasswordBearer("/api/token")

def create_database():
    # Create database tables
    return _database.Base.metadata.create_all(bind=_database.engine)

def get_db():
    # Dependency to get a database session
    db = _database.SessionLocal()
    try:
        yield db
    finally:
        db.close()

async def get_user_by_email(email: str, db: _orm.Session):
     # Retrieve a user by email from the database
    return db.query(_models.User).filter(_models.User.email == email and _models.User.is_verified==True).first()

async def create_user(user: _schemas.UserCreate, db: _orm.Session):
    # Create a new user in the database
    try:
        valid = _email_check.validate_email(user.email)
        name = user.name
        email = valid.email
    except _email_check.EmailNotValidError:
        raise _fastapi.HTTPException(status_code=404, detail="Please enter a valid email")

    user_obj = _models.User(email=email, name=name, hashed_password=_hash.bcrypt.hash(user.password))
    db.add(user_obj)
    db.commit()
    db.refresh(user_obj)
    return user_obj

async def authenticate_user(email: str, password: str, db: _orm.Session):
    # Authenticate a user
    user = await get_user_by_email(email=email, db=db)

    if not user:
        return False

    if not user.is_verified:
        return 'is_verified_false'

    if not user.verify_password(password):
        return False

    return user


async def create_token(user: _models.User):
    # Create a JWT token for authentication
    user_obj = _schemas.User.from_orm(user)
    user_dict = user_obj.model_dump()
    del user_dict["date_created"]
    token = jwt.encode(user_dict, JWT_SECRET, algorithm="HS256")
    return dict(access_token=token, token_type="bearer")

async def get_current_user(db: _orm.Session = _fastapi.Depends(get_db), token: str = _fastapi.Depends(oauth2schema)):
     # Get the current authenticated user from the JWT token
    try:
        payload = jwt.decode(token, JWT_SECRET, algorithms=["HS256"])
        user = db.query(_models.User).get(payload["id"])
    except:
        raise _fastapi.HTTPException(status_code=401, detail="Invalid Email or Password")
    return _schemas.User.from_orm(user)

def generate_otp():
    # Generate a random OTP
    return str(random.randint(100000, 999999))

def connect_to_rabbitmq():
    # Connect to RabbitMQ
    while True:
        try:
            connection = pika.BlockingConnection(pika.ConnectionParameters(RABBITMQ_URL))
            return connection
        except pika.exceptions.AMQPConnectionError:
            print("Failed to connect to RabbitMQ. Retrying in 5 seconds...")
            time.sleep(5)


def send_otp(email, otp, channel):
    # Send an OTP email notification using RabbitMQ
    connection = connect_to_rabbitmq()
    channel = connection.channel()
    message = {'email': email,
               'subject': 'Account Verification OTP Notification',
               'other': 'null',
               'body': f'Your OTP for account verification is: {otp} \n Please enter this OTP on the verification page to complete your account setup. \n If you did not request this OTP, please ignore this message.\n Thank you '
                }

    try:
        queue_declare_ok = channel.queue_declare(queue='email_notification', passive=True)
        current_durable = queue_declare_ok.method.queue

        if current_durable:
            if queue_declare_ok.method.queue != current_durable:
                channel.queue_delete(queue='email_notification')
                channel.queue_declare(queue='email_notification', durable=True)
        else:
            channel.queue_declare(queue='email_notification', durable=True)

        channel.basic_publish(
            exchange="",
            routing_key='email_notification',
            body=json.dumps(message),
            properties=pika.BasicProperties(
                delivery_mode=pika.spec.PERSISTENT_DELIVERY_MODE
            ),
        )
        print("Sent OTP email notification")
    except Exception as err:
        print(f"Failed to publish message: {err}")
    finally:
        channel.close()
        connection.close()
D. Triển khai Dịch vụ Machine Learning (Machine Learning Microservice)
Trong phần này, chúng ta sẽ tập trung vào việc triển khai dịch vụ machine learning, dịch vụ này hoạt động như điểm vào cho tất cả các yêu cầu liên quan đến OCR (Optical Character Recognition) trong kiến trúc microservices của chúng ta. Dịch vụ machine learning có trách nhiệm xử lý các yêu cầu OCR, trích xuất văn bản từ hình ảnh và gửi thông báo khi hoàn thành.
Bây giờ, hãy triển khai dịch vụ machine learning.
Tạo một tệp main.py trong thư mục mlservices/ với mã sau:
Đoạn mã Python này kết nối tới một máy chủ RabbitMQ và tiêu thụ các tin nhắn từ một hàng đợi có tên là ‘ocrservice’. Khi nhận được một tin nhắn, nó xử lý nó bằng một đối tượng OCRService, gửi một thông báo email bằng cách sử dụng hàm sendemailnotification, và sau đó xuất bản phản hồi tới hàng đợi reply. Nó xác nhận việc giao hàng của tin nhắn tới RabbitMQ sau khi xử lý mỗi tin nhắn. Kịch bản sử dụng một số lượng prefetch là 1 để giới hạn số lượng tin nhắn chưa được xác nhận mà RabbitMQ sẽ giao.
import pika
import json
from utils import OCRService
from utils import send_email_notification

# Connect to RabbitMQ
connection = pika.BlockingConnection(pika.ConnectionParameters(host='localhost'))
channel = connection.channel()
channel.queue_declare(queue='ocr_service')

# Callback function to process OCR requests
def on_request(ch, method, props, body):
    # Initialize OCR service
    ocr_service = OCRService()
    # Process OCR request
    response = ocr_service.process_request(body)

    # Send email notification
    send_email_notification(response['user_email'], response['ocr_text'], channel)

    # Publish response to the reply queue
    ch.basic_publish(exchange='',
                     routing_key=props.reply_to,
                     properties=pika.BasicProperties(correlation_id = \
                                                         props.correlation_id),
                     body=json.dumps(response))
    # Acknowledge the message delivery
    ch.basic_ack(delivery_tag=method.delivery_tag)
# Set prefetch count to 1
channel.basic_qos(prefetch_count=1)
# Consume messages from the 'ocr_service' queue
channel.basic_consume(queue='ocr_service', on_message_callback=on_request)
# Start consuming messages
print(" [x] Awaiting RPC requests")
channel.start_consuming()
Tạo một tệp utils.py trong thư mục mlservices/ với mã sau:
import json
import base64
import pandas as pd
#keras ocr pipeline and imports
import keras_ocr
import pika


class OCRService:

    def __init__(self):
        self.keras_pipeline = keras_ocr.pipeline.Pipeline()

    def keras_ocr(self, image_path):
        results = self.keras_pipeline.recognize([image_path])
        df = pd.DataFrame(results[0], columns=['text', 'bbox'])
        words = df['text'].tolist()
        sentence = ' '.join(words)
        return sentence

    def process_request(self, message):
        message_body = json.loads(message)
        user_name = message_body['user_name']
        user_email = message_body['user_email']
        user_id = message_body['user_id']
        file_base64 = message_body['file']
        print(f" [x]user_id: {user_id} request recieved from gateway..")
        print(f" [x]processing request for {user_name}")

        # Assuming file_base64 contains the base64-encoded string
        file_data = base64.b64decode(file_base64.encode())
        # Write the decoded file data to a new file
        with open('artifacts/decoded_file.png', 'wb') as f:
            f.write(file_data)

        image_path = "artifacts/decoded_file.png"
        ocr_text = self.keras_ocr(image_path)
        print(" [^]OCR processing done !!!")

        response = {
            "user_id": user_id,
            "user_name": user_name,
            "user_email": user_email,
            "ocr_text": ocr_text
        }

        return response

def send_email_notification(email, ocr_text, channel):
    # Send an email notification using RabbitMQ
    message = {
        'email': email,
        'subject':'OCR Process Completed !!',
        'body':f'We are pleased to inform you that the OCR (Optical Character Recognition) process for your image has been successfully completed.\n The extracted text has been processed and is now ready for use.\n\n  OCR text : {ocr_text}',
        'other': 'null',
       }

    try:
        channel.basic_publish(
            exchange="",
            routing_key='email_notification',
            body=json.dumps(message),
            properties=pika.BasicProperties(
                delivery_mode=pika.spec.PERSISTENT_DELIVERY_MODE
            ),
        )
        print("Sent OCR Process Completed email notification")
    except Exception as err:
        print(f"Failed to publish message: {err}")
D. Implementing the Notification Microservice
D. Triển khai Dịch vụ Thông báo (Notification Microservice)
Trong phần này, chúng ta sẽ tập trung vào việc triển khai dịch vụ thông báo, dịch vụ này gửi thông báo qua email cho người dùng.
Tạo một tệp main.py trong thư mục notificationservice/ với mã sau:
Đoạn mã này thiết lập một tiêu thụ RabbitMQ lắng nghe các tin nhắn trên hàng đợi “emailnotification”. Khi nhận được một tin nhắn, nó gọi hàm notification từ mô-đun email_service để xử lý quá trình thông báo. Nếu thành công, nó xác nhận tin nhắn; nếu không, nó từ chối tin nhắn và in ra một thông báo lỗi.
import pika
import sys
import os
import time
import email_service
from dotenv import load_dotenv

# Load environment variables
load_dotenv()
RABBITMQ_URL = os.environ.get("RABBITMQ_URL")

def main():
    # rabbitmq connection
    connection = pika.BlockingConnection(pika.ConnectionParameters(host=RABBITMQ_URL))
    channel = connection.channel()

    def callback(ch, method, properties, body):
        try:
            err = email_service.notification(body)
            if err:
                ch.basic_nack(delivery_tag=method.delivery_tag)
            else:
                ch.basic_ack(delivery_tag=method.delivery_tag)
        except Exception as e:
            print(f"Error processing message: {e}")
            ch.basic_nack(delivery_tag=method.delivery_tag)

    channel.basic_consume(
        queue="email_notification", on_message_callback=callback
    )

    print("Waiting for messages. To exit press CTRL+C")

    channel.start_consuming()


if name == "main":
    try:
        main()
    except KeyboardInterrupt:
        print("Interrupted")
        try:
            sys.exit(0)
        except SystemExit:
            os.exit(0)
Tạo một tệp email_service.py trong thư mục notification_service/ với mã sau:
import smtplib, os, json
from email.message import EmailMessage
from dotenv import load_dotenv
from email.mime.text import MIMEText


load_dotenv()

def notification(message):
    try:
        message = json.loads(message)
        receiver_address = message["email"]
        subject = message["subject"]
        body = message["body"]
        other = message["other"]

        sender_address = os.environ.get("GMAIL_ADDRESS")
        sender_password = os.environ.get("GMAIL_PASSWORD")

        # Gmail SMTP server settings
        smtp_server = 'smtp.gmail.com'
        smtp_port = 587

        server = smtplib.SMTP(smtp_server, smtp_port)
        server.starttls()
        server.login(sender_address, sender_password)

        # Compose the email message
        msg = MIMEText(body)
        msg['Subject'] = subject
        msg['From'] = sender_address
        msg['To'] = receiver_address

        server.sendmail(sender_address, receiver_address, msg.as_string())
        server.quit()

        print("Mail Sent")
    except Exception as e:
        print(f"Failed to send email: {e}")
Tóm lại
chúng ta đã triển khai thành công một kiến trúc microservices từ đầu đến cuối bằng cách sử dụng FastAPI và RabbitMQ. Chúng ta đã thực hiện cách tạo một dịch vụ xác thực người dùng, một dịch vụ máy học cho xử lý OCR, và một dịch vụ thông báo cho các thông báo qua email.
Trong suốt bài viết này, chúng ta đã học về các khái niệm chính của microservices, như cách phân tách dịch vụ, giao tiếp qua hàng đợi tin nhắn, và lợi ích của việc sử dụng xử lý bất đồng bộ để mở rộng và cải thiện hiệu suất.
Để chạy dự án, hãy tuân theo các hướng dẫn trong tệp README của kho GitHub tại đây. GitHub: https://github.com/shantanu1905/fastapi-microservice-demo